Recipes

Thanksgiving Apple Pie

I’ve been making the same apple pie for Thanksgiving for literal decades now, every so often changing up the mix of apples inside. This year, I decided to get crazy and change up the filling. It turned out really well, so I want to write it down now before I forget what I did.

Crust: I used Martha Stewart’s Pate Sucree, which you can see here. It says it is not for a double crust pie, but I’ve been using it for apple pies for a while now. It works really well with the dense filling.

Pie:

Preheat oven to 375 degrees.

6-7 cups of apples, peeled, cored and sliced.  I go for a medium slice – maybe about ¼ inch thick.

I used 6 apples, but have used as many as 9 if the apples were small.  This time I used 2 Macintosh, 2 Granny Smith and 2 Sugar Bee apples.  I like Braeburns for pie, but they didn’t have any, and my grandmother always swore by Macintosh apples, so I got those.  Even though I think they are kind of mushy, their flavor holds up in the pie.

¾ cup light brown sugar

2 ½ tablespoons all-purpose flour

1 teaspoon cinnamon

½ teaspoon nutmeg

1 teaspoon vanilla extract

2 teaspoons lemon juice

Zest of one lemon

2 tablespoons of butter, but into small pieces.

Milk, for brushing the top crust of the pie

Cinnamon sugar (I think we did 2 tablespoons of sugar to one teaspoon of cinnamon. You won’t use all of that though.) for sprinkling.

Mix the brown sugar, flour, cinnamon, nutmeg, lemon juice and lemon zest together.

Put the bottom pie crust in the pie plate.  Fill with the apple slices, going around the outer edge first and then making smaller circles until the bottom is covered.  I like to alternate between the three types of apples.  Sprinkle with 1/3 of the brown sugar mixture. 

Add a second layer of apples, again going in a circle.  Top with 1/3 of the brown sugar mixture.

Add a third layer of apple slices, going in a circle.  Poke any leftover slices you see into gaps in your apple pile.  Top with the final 1/3 of the brown sugar mixture.

Dot the filling with the small pieces of butter.

Add the top crust.  Pinch to seal the two crusts together and flute the edges.

Take a small knife and cut a little circle out of the dough in the center of the pie.  Then take the knife and carve other vents in the dough.  You can cut out whatever shape you like, or even just slice a S shape (that’s what I do).

Brush with the milk, and then sprinkle the cinnamon sugar on the top, so that there is a light coating.

Put your pie plate on a baking sheet and bake for 40-45 minutes at 375 degrees F.  You’ll know it is done with the filling starts to bubble up through the vents (just a little).

Uncategorized

Roast Pork Shoulder

My husband randomly picked up a small pork shoulder roast at the store last week and I had to figure out what to do with it. A lot of pork shoulder recipes have you cook the roast for hours and hours at a low temperature or in a slow cooker. I don’t have a slow cooker and also I had stuff to do on Sunday and didn’t want to spend four hours cooking a 3 lb roast. So this is what I did instead. The onions mixed with the fat from the pork roast and added a ton of flavor. We had this with egg noodles.

Ingredients:

3lb pork shoulder

1 large onion, sliced thinly

2 tablespoons plus 1 tablespoon of butter

2 garlic cloves, minced

1 cup of chicken broth

1 tablespoon soy sauce

a little olive oil

Directions:

Pre-heat oven to 350 degrees.

Rub the roast with the olive oil

Melt 2 tablespoons of the butter in a dutch oven. Brown the roast on all sides in the butter, about 3-5 minutes per side.

Set the roast aside.

Add in the onions and garlic and saute for 5 minutes. Stir in the chicken broth and soy sauce. Scrape down the pan (deglaze) and bring the broth to a boil.

Place the roast in a roasting pan. Pour the broth and onion mixture over it.

Roast for 90 minutes.

Knitting

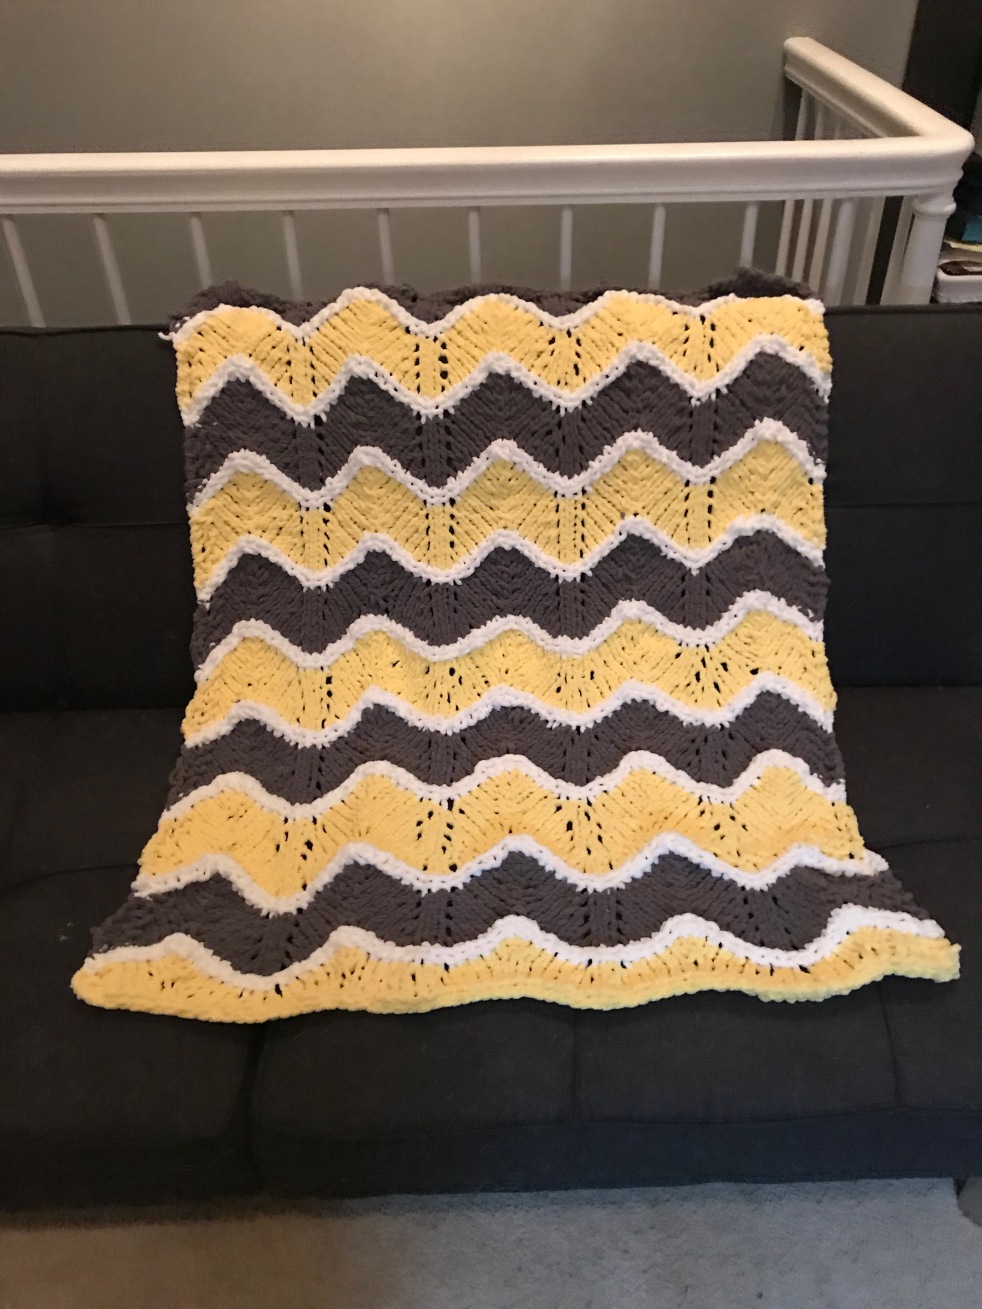
Baby blanket for my niece

This is the last knitting project I managed to finish in 2020. It’s a baby blanket for my niece, who was born in February. Since then, all of my projects have fizzled. I started another blanket that I thought would be interesting because it was a sampler of a bunch of different patterns. But instead it was super fiddly and annoying. I still like the concept, so maybe I’ll go back to it one day.

Then I rage quit a scarf with a super simple pattern that I screwed up because I was knitting and watching my son play Roblox, which apparently was too much for my brain.

Right now I’m working on this very pretty lace scarf called Lovely Leaf Lace from Purl Soho, using a purple, white and grey self-striping yarn. We’ll see if I actually finish this one.

Recipes

Baked Lemon Chicken with Tomatoes and Peppers

Here’s a super flavorful way to use tomatoes and bell peppers from the garden. Also great if you want lemon-y chicken but forget to make a marinade ahead of time.

Ingredients

1 lb (ish) chicken breasts. I made this with boneless/skinless breasts, but I bet it would be good with bone-in too.

3 tablespoons of better

1/2 medium white onion

1/2 red pepper

1/2 yellow pepper

3 cloves of garlic

2 teaspoons of oregano

1 teaspoon salt

4 tablespoons lemon juice

5 small (campari/roma style) tomatoes, halved

Directions:

Pre-heat the oven to 400 degrees.

Melt the butter. Brown the chicken, onions, garlic and peppers in a skillet. 3-5 minutes per side for the chicken.

Mix lemon, salt and half of the oregano.

Spray a roasting pan (metal is best for this) with oil or cooking spray

Place chicken, peppers, garlic and onions in the pan. Add halved tomatoes.

Mix the skillet juices with the lemon juice, salt and oregano mixture. Pour over chicken and veggies. Cook for 12 minutes.

Flip chicken. Sprinkle on remaining oregano. Cook for 12 more minutes.

Serve with rice. Could also serve with tzatziki.

Recipes

Yeah, I don’t know

I had big intentions of starting to write regularly, and then eh. This has been the summer of staying home and not feeling very enthusiastic about anything. It’s hard to get into books, into TV shows, into new projects, pretty much anything right now.

But I have made a few nice recipes lately, so I’ll start there, I guess. My garden has done really well this year and I have happily eaten a bazillion tomatoes. Here is one of my favorite ways to eat them:

Bruschetta w/ crostini.

2 cups of fresh tomatoes, chopped. Really, you could probably go up to 4 cups.

1/4 small red onion, finely chopped

1 clove of garlic, thinly sliced and minced

1 teaspoon of salt

3 tablespoons of olive oil — or you can do 1 tablespoon olive oil and 2 tablespoons of canola oil if your olive oil is on the heavy side. Plus a little extra for the crostini.

1 1/2 tablespoons of balsamic vinegar

Chopped fresh basil leaves — about 6-10 leaves.

1 baguette.

Shredded mozzarella — maybe 6 oz.

Directions:

Mix ingredients together in a bowl. Drizzle with olive oil and vinegar and stir to coat.

Preheat oven to 400 degrees.

Slice a baguette into 1/2 inch rounds. Brush each side with olive oil. Bake for 2-3 minutes.

Flip and top with the mozzarella. Bake 2-3 minutes more. Top with tomato mixture and serve.

Uncategorized

Back in the game

Blogging is dead, I know. Even my mom has one now. I had one back in 2004. Eventually, I had a kid. And I don’t know how mommy blogging ever got to be so big, because I once I had a baby, I had no free time. And then at some point when I was consumed with other stuff, my domain expired and that blog disappeared.

But now I want a space to write again, and I don’t want to do it on Facebook and Twitter’s not long enough and I’m really more of a written word person, so Insta is out.

So here I am. This isn’t going to be one of those coherent, focused blogs that will monetize things or have a brand. It’s a place where I will ramble, post recipes I like, put up photos of knitting projects and my dog, and go on about books that I enjoy. I’m looking forward to writing regularly again.